
As an Amazon Associate I earn from qualifying purchases.
by ElenaStyle
As an Amazon Associate I earn from qualifying purchases.
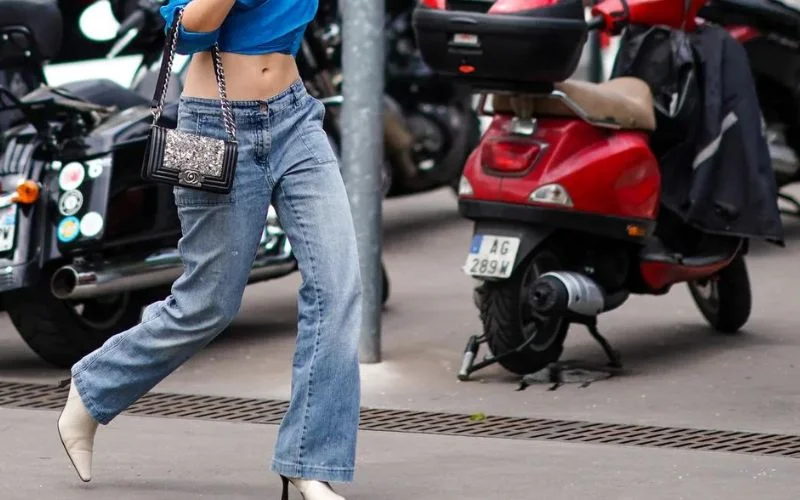
Women’s high-rise jeans have been popular for the past few years, but trends are shifting back to low-rise styles. If you have high-rise jeans in your closet that you no longer wear, don’t throw them out! With some simple alterations, you can convert high-rise jeans into trendy low-rise jeans.
This comprehensive guide will walk you through the complete process step-by-step. Follow along to learn how to professionally alter the waistline of jeans for a perfect custom fit.
Before getting started, you’ll need to gather a few supplies:
Make sure you have all of these materials on hand before beginning the waistline alteration process.
The first step is deciding where you want the new low-rise waistline to hit. For a traditional low rise, measure about 3 inches below your natural waistline. Use tailor’s chalk or a fabric marker to draw a line across the jeans at this point.
Make sure the line is even all the way around the jeans. The chalk line marks where you’ll cut the jeans in the next steps.
Before cutting, check the placement of the front and back pockets. If any of the pockets sit above the new waistline, you’ll need to detach them first
Carefully rip out the stitches attaching the pockets using seam rippers or small scissors. Remove the pockets completely and set them aside – you’ll reattach them later.
If the pockets fall below the new waistline, you can leave them in place for now.
The next step is removing the original high-rise waistband. Carefully rip out the stitches attaching the waistband all the way around the jeans using a seam ripper
Detach the waistband completely and set it aside.
You’ll also need to open the top few inches of the fly zipper using the seam ripper. This allows you to easily alter the waistline.
Now it’s time to cut the jeans along the chalk line marking your new low-rise waist placement. Carefully cut through all the layers of fabric using your sharp dressmaking shears
Cut slowly and accurately for the best results. Remove the excess fabric above the line.
Finish the new cut edge by folding over 1/2 inch of fabric and pressing it in place
This creates a clean folded edge.
You can pin the fold in place or use an iron to press it flat. Try on the jeans to check the fit at this stage.
If the jeans are loose at the hips/seat after lowering the waistline, you can take in the side seams for a better fit.
Rip out the original side seam stitches and re-sew the seams with a smaller seam allowance. Taper the seams so they take in more fabric at the hip area.
To reattach the waistband, you need to alter it to fit the new lower waist measurement. Measure the jeans at the folded edge you created in step 5.
Then, rip out the side seam stitches on the waistband only to resize it to this new measurement
Take in the side seams on the waistband as needed.
The original zipper will now be too long for the lowered waist. Shorten it by stitching across the zipper teeth 1-2 inches below the waistline
This will create a new stop point for the zipper. Cut off any excess zipper tape above the stitches.
If you removed any pockets in step 2, pin them back in their original placement. Hand stitch them or use a sewing machine to reattach the pockets securely.
Be sure to line them up properly so the pockets sit straight and even.
The last major step is reattaching the altered waistband. Pin it to the top of the jeans, matching the side seams and zipper placement.
Stitch the waistband back on using a sewing machine if possible
Go slowly to ensure the zipper is caught in the seam neatly.
You did it! Now try on your newly converted low-rise jeans to make sure the fit is perfect. Check the placement of the waistline and pockets.
Make any additional adjustments needed for the best custom fit. Let out the side seams if the hips are too tight.
Once the fit is just right, finish up your jeans conversion. Iron the waistband flat for a crisp look. Add thread locks at the waist seam to prevent unraveling.
Consider adding fun embellishments like embroidery, patches, or studs to personalize your new low-rise jeans!
Also Read: What Is The Difference Between Flare Jeans and Bootcut Jeans?

Follow these extra tips for a flawless waistline alteration:
Measure carefully and mark the new waistline accurately: This is crucial to ensure that the new waistline of your jeans will sit exactly where you want it to. Use a soft measuring tape to measure the desired distance from your natural waistline, and mark this point all around the jeans with tailor’s chalk or a fabric marker.
Use very sharp scissors or shears when cutting denim: Denim is a thick and tough fabric, so using sharp scissors or shears will make the cutting process easier and more precise. Dull scissors can lead to jagged or uneven cuts.
Pin the waistband and pockets to hold them in place when sewing: Pins help to keep the fabric in place while you’re sewing, ensuring that the waistband and pockets are attached evenly and securely. This is especially important when working with heavy fabrics like denim, which can easily shift or slip under the sewing machine.
Set your sewing machine to a longer stitch length for sewing denim: Denim is a thick fabric, and a longer stitch length will help the sewing machine handle it more easily. A longer stitch length also creates stronger seams, which is important for the durability of your jeans.
Always try on the jeans before finishing to perfect the fit: Trying on the jeans at various stages of the alteration process allows you to check the fit and make any necessary adjustments. This is especially important before you finish the waistband or hem, as these are difficult to alter once completed.
Wash before wearing to allow the hem and seams to settle: Washing the jeans after alterations but before wearing them helps to soften the fabric and allows the new seams and hem to settle into place. It also ensures that any chalk or fabric marker lines are removed
Converting jeans takes time, patience, and skill. Go slowly and double check each step. Don’t be afraid to rip out stitches and redo any step if your alterations aren’t perfect.
Converting high-rise jeans into low-rise jeans can be a tricky task, but with the right approach, it can be done. Here are some common problems you might encounter and their solutions:
When you lower the waistband, the seat area of the jeans might become too baggy. This can be fixed by pinching the center seam to the point where there’s not as much bagginess in the back. Be careful not to do it too much because if you lower the waistband too much, it might be uncomfortable or fall down too far when you try to sit.
If the jeans are too big around the waist, you can take in the waist. This can be done by opening the back, taking in at the center seam, taking in on the waistband, and then closing it.
If the jeans are too long after converting them to low-rise, you can hem them. This can be done by measuring the desired length, marking it, cutting off the excess fabric, and then sewing a new hem .
If the jeans are too tight around the hips after converting them to low-rise, you can let out the side seams. This can be done by carefully ripping the side seams, adding a strip of matching fabric to each side, and then sewing the seams back together.
Remember, when altering jeans, it’s important to go slowly and make adjustments a little at a time for the best results. It’s also a good idea to try on the jeans after each adjustment to make sure they fit well.
Also Read: Can Women Wear Men’s Jeans? The Cool Girl’s Guide
Here are a few tips for styling low-rise jeans:
1.Pair them with cropped tops or tucked-in blouses to show off the waistband. This elongates your torso and balances out the low waistline. Go for cropped sweaters or fitted tanks.
2.Wear low-rise jeans with oversized or billowy tops. The loose fit helps camouflage the low waistband if you’re self-conscious about exposing skin. Try boxy button-downs, flowing kimonos, or oversized sweatshirts.
3.Choose low-rise jeans with a relaxed, baggy fit like straight leg or wide leg styles. The looser silhouette is more flattering and helps hide any muffin top.
4.Accessorize with belts, scarves, or jackets wrapped around your waist. This draws eyes up and creates shape while covering the waistband.
5.Pair with heels or boots to elongate your legs, making the low rise less noticeable. Ankle boots work well with cropped jeans.
6.Stick to dark washes, which are slimming on the hips and thighs. Lighter washes can accentuate any problem areas.
7.Look for low-rise jeans with stretch for comfort, and always make sure they fit well at the widest part of your hips. The right fit helps them stay in place
The key is finding a flattering silhouette and using tops or accessories to draw attention upwards from the low waistband. With the right styling, low-rise jeans can look chic and modern
Converting high-waisted jeans into a low-rise style takes some effort, but yields a stylish, customized pair of jeans. Carefully mark and cut the new waistline, finish the raw edge, resize the waistband, shorten the zipper, and reattach pockets and waistband. Go slowly, double check fit often, and be prepared to rip out and redo stitches until the jeans fit perfectly.
With the right supplies and techniques, you can update ill-fitting jeans and achieve the ideal low-rise fit. Altering your own jeans saves money and lets you customize them precisely to your body.
Straight body type: With their ruler-like shape, straight body types suit the low waistline of low rise jeans. This creates a flattering silhouette and contrast between the jeans and tops. Skinny or straight leg low rise jeans work best.
Inverted triangle: The narrow hips and strong shoulders of this body type are complemented by low rise jeans sitting below the waist. Pair with crop tops to accentuate the upper body.
Hourglass: Hourglass figures with shorter waists can pull off low rise jeans well. The jeans sit below the natural waistline, accentuating the hips and curves.
Athletic: Defined abs and waists look great with the low waistline of low rise jeans. Stretch denim styles allow for movement.
Skinny body type: Low rise jeans elongate the legs on slim figures. Dark washes work best to create a streamlined silhouette.